
The Ultimate Guide to Bushcraft BBQ
Discover > BBQ at Home > The Ultimate Guide to Bushcraft BBQ

If you like cooking and the great outdoors, you’ll almost certainly love the excitement of combining the two, especially right here in Texas. That being said, not all cooks like the outdoors, and not all outdoorsmen like cooking.
If throwing some unseasoned meat over an open flame does it for you, then more power to you! But if you love good food as much as you love the slow pace of the natural world, keep on reading.
Traditional vs Bushcraft BBQ
Fire Starting
While convenience is king these days, bringing store-bought firelighters to the bush is a mark of a glamper. Of course, some bushcraft masters may argue that even using a ferro rod is “taking the easy route”, so to each their own.
Natural fire starters can be found just about anywhere in the wild. Dry, fibrous plant material can catch a spark just as well or even better than many brands of lighter cubes. Given that Texas is probably the most diverse US state when it comes to fauna and landscape, listing even a fraction of the natural fire starters you can find would take all day. So, here are some of my favorites:
Cedar bark – Cedar is a super resinous wood, which makes it brilliant for tinder. To use it, strip some bark (preferably off a dead tree), break it up into fibers using your hands, and there you have it!
Thistles – When a thistle reaches the end of its cycle, it puffs up its seeds to be spread around by the wind. While they don’t burn for long, they take a spark better than anything man-made.
Cattail – As with thistle puffs, cattails burn exceptionally quickly but take a spark phenomenally well. The part of the cattail you need to use is the flower head. Once you break it apart, the fluff inside will expand in volume at least tenfold.
Dry grass – Cedar bark, thistles and cattails are pretty exclusive to East and North Texas. Dry grass, however, can be found all over the Lone Star State.
Wood
Wood is by far the most important thing to consider when cooking on an open flame. The hardness (or softness) of the wood, as well as how resinous it is, makes a huge difference in terms of burning power and taste.

When it comes to cooking in the bush, you need to be even more mindful here. This is because you’ll be cooking with wood that hasn’t been dried, also known as green wood. Green wood has over double the moisture content of cured wood, and therefore loses a ton of energy due to evaporating water. The resin is also highly volatile and melts easily, releasing its unsavory terpenes onto whatever you’re cooking.
So how do you avoid these bothersome factors when cooking in the bush? Here are some tips:
Use non-resinous wood – All wood contains some resin, meaning inedible terpenes in the sap can leak out and stick to food. Rather annoying! However, you can minimize this by using hard woods such as oak or mesquite, fruitwoods like cherry, and nut woods such as pecan.
Cook with embers – Cooking over a big pile of red hot embers is a lot easier than it may seem, and it is in fact one of the easiest methods.
Use dead wood – Whenever I tell people to cook with dead wood, they all have the same look… Nevertheless, it’s more than acceptable to use dead or fallen wood, as long as it’s not spongy and/or crumbly.
Equipment
Tools
A knife is your lifeline out in the bush, so if you don’t have a high-quality, full-tang fixed blade knife, it’s time to get one.
Cordage is only second in importance to a knife, as it’s relatively hard to recreate in the wild. A couple of feet of parachute cord can make all the difference in any situation.
While axes and saws are luxuries, they’re damn helpful luxuries. Gathering and processing firewood takes less than half the time when you’ve got more than a knife to hand.
Fire starters, by which I mean lighters, matches, Ferro rods, magnesium, etc, are always useful. Make sure to bring a few. If you spend enough time in the bush, one’s bound to give out eventually.
Cooking Equipment
Cooking grates can be bought in all manner of shapes, sizes, and styles. From simple square grates to folding ones and others that can be stuck in trees, there’s one for every taste. Cast iron is used for some cooking grates and is a highly durable material, but it does require a bit more care.
Cast-iron skillets are the perfect outdoor cooking tool, as long as they’re kept dry. Other than their susceptibility to water, they’re exceptionally durable and work very well over an open flame. If you’re looking for a high-quality cast-iron pan, check out my recommendations here.
A wooden cutting board, as big as you can find, is essential for staying organized and keeping your produce clean. Using a good board, you can prep all your produce and keep it aside, before adding it to a griddle or pan.
How to Start a Fire
Finding a Fire Spot
There are a few obvious things to bear in mind when you’re looking for a fire spot. First, make sure there are no low-hanging trees. Secondly, keep a reasonable distance from any water source (particularly if you’re near any rising tides). And of course, watch out for any bans or restrictions.

Getting it Going
Kindling for a fire should consist of soft, dry wood. It doesn’t matter if it’s green, but cured wood will always ignite better. Make sure you have plenty of tinder and kindling at the ready. A common bushcraft saying goes as follows: gather enough wood until you think you have enough, then double it!
Start by breaking down some pieces of soft, dry wood into three different sizes — shavings from making a feather stick, medium-sized pieces like twigs and small sticks, and larger pieces that are eight to 12 inches long. If you want to build a base or pit using rocks or thick, green logs, you can do that now.
Once you’re ready to start the fire, take the larger pieces of wood and stack them like you would a Jenga tower, except here you need to leave a hollow space in the middle. Then add various sizes of kindling inside the tower, light them, and start to add the medium-sized wood pieces. Wait for about ten minutes for the kindling to burn. Once it’s burning nicely, start to add logs, starting with the smallest ones.
Tips
Make sure you don't overcrowd the fire – a lack of oxygen is its biggest demise.
You can process wood easily using a knife that has a 6+ inch blade. Simply use a log as a mallet and a knife as a chisel.
Heat travels upwards – teepee-shaped fires will burn down to a suitable fire, allowing you to start cooking.
Cooking Styles
Rotisserie Style
Rotisserie-style cooking over a fire is exactly what it sounds like. Nevertheless, it’s a little more complicated than skewering a stick through a chicken. As the fat renders, it lubricates the stick, meaning the chicken (or whatever you’re cooking) will start to spin freely.
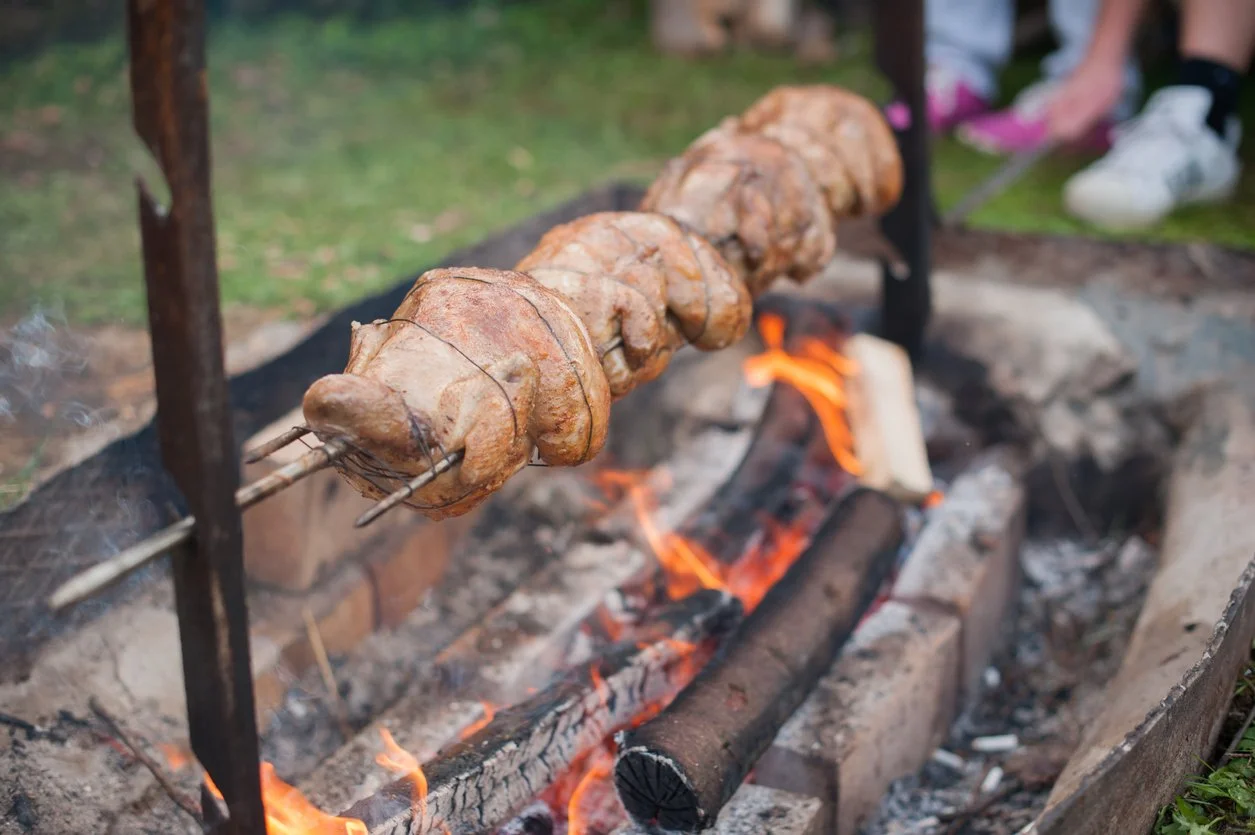
First, you need two Y-shaped sticks that are anywhere from 8 or 9 inches to a couple of feet long. These will be the supports on either side of your rotisserie. Make sure they’re made of green wood.
Grab a second stick that's at least one third longer than your fire, and at least a quarter of an inch in diameter. Remove the bark from the stick and scrape off any excess material before splitting it down the middle until you reach the last five to six inches of the stick.
Skewer the meat with the split stick. Then when you’re about halfway through, pinch and tie off the split end using a paracord. Hammer the forked stick into either side of your campfire, lay the rotisserie meat over it, and spin as needed.
Cooking Tripod
A cooking tripod is good for grilling, but it’s brilliant for smoking. By making a tripod, attaching a grate, putting it over a fire, and covering it with shrubbery, you can make the perfect wilderness smoker.
Start with three long, green sticks that are about 10 to 15 feet tall and around half an inch in diameter. Tie them together at the top, stand them up, and spread the sticks until they stabilize. From here, you can either hang a kettle on a chain, or you could have a grill hovering over the open flame.
It’s pretty difficult to recreate a grate for grilling in the wild, so avoid it if at all possible. There are plenty of pre-made bushcraft grills you can buy at any outdoor outlet or online.
Swedish Torch
A Swedish torch is very useful when using a cast-iron skillet. All it is, is a log that’s at least 16 inches in length and 8–10 inches in width, with a cross cut into it.
To get your Swedish torch blazing, you’ll need a log like the one mentioned above (preferably dried and cured) and a chainsaw. You can use an ax instead, but doing so can often make the surface too uneven for good cooking.
Start your chainsaw and cut a cross or an X about three-quarters of the way down into the log. Then start packing the gaps with kindling and other flammable material before lighting them and leaving the torch to burn.
After 10 to 15 minutes, the torch should be burning nicely and ready for a pan or Dutch oven. This is particularly helpful if you’re cooking up a side or two while the meat spins.
Tips for Outdoor Cooking
Plan Ahead
Time of year is the biggest factor to consider before heading out into the bush. The weather, the edibles available, and––in some places––the large animals that can charge at you during mating season all play a significant role.

However, there are a few other important things to plan for too! Make sure you’re prepared in the case of any injuries, faulty equipment, getting lost, etc. It’s all fun and games until you’re in a desperate or potentially dangerous situation.
Consider Wild Edibles
We all know resourcefulness is an attractive quality, and even more so in the wild! Whipping up something tasty with nothing but your surroundings, a couple of tools, and your bare hands is about as resourceful as it gets. Make sure you do your homework and find out what's in season to ensure your dishes are as successful as possible. Here’s a helpful list of seven plants that you can find around Texas.
Consider Fire Bans & Restrictions
Fire bans and restrictions have always been common in Texas, particularly in the dry months, and for good reason! Sadly, many people are unaware of the risk of ground fires. Unlike surface fires, ground fires occur when an accumulation of humus, peat, and other dry vegetation ignites underground. The destruction these fires cause is irreversible, destroying essential root systems in forests and other biomes. Texas A&M Forest service has a burn ban map, which is useful to browse before heading out into the bush.
The wilderness can be your best friend or your worst enemy, depending on your skill level, outlook, and general intuition. When it comes to an outdoor lifestyle, the most important thing is to respect nature as you would a human being. Leave minimal traces of your presence, and after you’re done foraging, leave something to rejuvenate. Remember to come prepared for any scenario, and of course, enjoy your time out in the wild!
For the best brisket restaurant in the Lone Star State, click here!
