
The Water Bottle Ice Cream Maker
A Simple Guide to Making Ice Cream with a Shake

The quest for homemade ice cream often conjures images of bulky machines and lengthy preparation times. However, the emergence of the water bottle ice cream maker has revolutionized this process, presenting an innovative and engaging way to create homemade desserts. This compact device harnesses the power of simple kinetic energy to churn cream into ice cream, requiring nothing more than a few shakes. It's a method that appeals to the adventurer within, as it combines the craft of making ice cream with the delight of a hands-on activity.
The process begins with adding ice cream base ingredients—cream, sugar, and flavors—into the water bottle. Once sealed, the bottle needs to be shaken vigorously for several minutes. During this shaking, the temperature of the mixture decreases due to the presence of ice and salt in an outer compartment, which causes the mixture to freeze. The effort put into shaking the bottle not only initiates the freezing process but also aerates the mixture, leading to a creamy texture reminiscent of traditional churning methods.
This method is accessible to those who may not have the space or the budget for a standard ice cream maker, offering a straightforward and cost-effective alternative. It also presents an opportunity to involve friends and family in the ice cream making process, turning dessert preparation into an enjoyable and interactive experience. Whether at home, on a camping trip, or during a picnic, making ice cream with a water bottle is a creative way to savor the sweetness of homemade treats.
Origins of Ice Cream

Ice cream's history spans centuries with roots in different cultures globally. It has evolved from simple iced beverages to the complex frozen desserts (What wine goes well with desserts?) enjoyed today.
Cultural History
The exact origin of ice cream is elusive, but ancient civilizations have left behind evidence of their love for chilled desserts. Ancient Greeks enjoyed a type of snow mixed with honey and fruits, while Romans had snow from mountains stored in insulated pits, later served with fruit toppings. The Chinese are credited with a method of creating an ice and milk concoction during the Tang Dynasty, laying a foundation for what would become modern ice cream.
During the 16th century, recipes for iced drinks and custards circulated in Europe, a precursor to the familiar dessert. European aristocracy often had access to iced treats made with salt and ice mixtures to lower the temperature below freezing, a luxury in times before refrigeration. It is known that George Washington and Thomas Jefferson had a penchant for these frozen delights, with the former owning an ice cream maker at Mount Vernon and the latter bringing a recipe back from France.
The transformation of ice cream from an elite indulgence to an affordable treat for the masses occurred during the 19th century. Jacob Fussell, a dairyman in Pennsylvania, established the first ice cream factory making its production more efficient and widespread. As technology improved, the availability and popularity of ice cream exploded, leading to the diverse array of ice creams we see today.
Fundamentals of Ice Cream Making

In ice cream production, understanding the manipulation of the freezing point and the crucial role of salt and ice crystals ensures a smooth and creamy dessert every time.
Understanding the Freezing Point
The freezing point is the temperature at which a liquid becomes a solid. For ice cream, it's pivotal to control this point to create the perfect texture. The addition of certain substances, such as sugar and fat, lowers the freezing point of the ice cream mixture, which allows it to remain soft even when cold.
Role of Salt in Ice Cream
Role of Salt Benefit in Ice Cream Making Lowering Freezing Point Prevents the ice cream mixture from freezing solid Heat Absorption Allows the ice cream to freeze quickly, resulting in smaller ice crystals
Salt is integral in the ice cream making process, especially when using traditional methods involving ice and salt mixtures. The salt causes the ice around the mixture to melt, absorbing heat and lowering the temperature below the normal freezing point of water, which speeds up the freezing of the ice cream.
Science Behind Ice Crystals
The texture of ice cream is largely determined by the size of the ice crystals formed during freezing. Small, uniform crystals yield a smooth texture, while larger crystals create an unpleasant icy mouthfeel.
Continuous agitation: When ice cream is churned, it breaks down ice crystals. This prevents them from growing large.
Rapid freezing: The quicker the ice cream mixture freezes, the smaller the ice crystals stay, enhancing the creaminess.
Ingredients Overview
Creating homemade ice cream with a water bottle ice cream maker is straightforward when using the right ingredients. Readers must note that the base components such as cream, milk, sugar, and eggs are pivotal to texture and flavor.
Cream and Milk
Cream and milk are fundamental to ice cream for their roles in texture and richness. The fat in cream contributes to a smooth consistency, while milk balances the mixture. Typically, heavy cream or half and half is used, paired with whole milk for best results.
Cream: Essential for smoothness
Milk: Balances the mixture
Sugar Varieties
The type of sugar used can affect both the sweetness and the body of the ice cream. Granulated sugar is most common, but one may also use brown sugar or honey for different flavor profiles.
Granulated sugar: Common for sweetness
Brown sugar / Honey: Adds unique flavors
Eggs and Fat Content
Eggs thicken the ice cream base and contribute to a creamier texture due to the fat content. The yolks are specifically used for their richness and emulsifying properties.
Eggs: Thickens and adds creaminess
Yolk Fat: Improves texture
Flavorings and Additives
Flavorings like vanilla extract define the ice cream's taste. Pure extracts offer a more natural flavor, while artificial flavors can provide a broader range. Additives may include fruits, chocolate, or nuts for texture and taste nuances.
Vanilla extract: For natural flavor
Additives: Enhance taste and texture
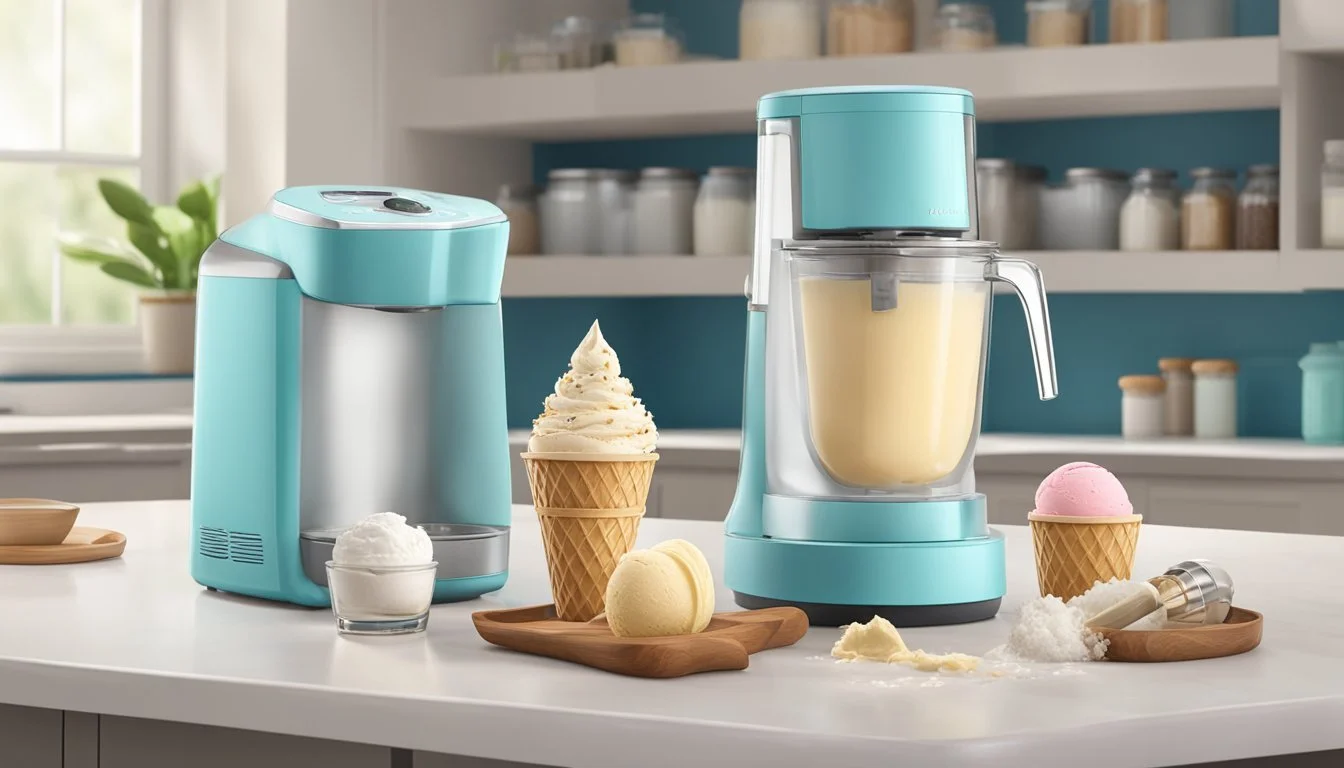
Water Bottle Ice Cream Maker
The Water Bottle Ice Cream Maker introduces an innovative way to create ice cream using a simple shake method. This method requires only a few readily available materials and is great for making single servings of ice cream.
Innovative Shake Method
The shake method revolutionizes the ice cream making process by allowing individuals to make ice cream in a water bottle by simply agitating the mixture until it solidifies. It's a manual process that combines the principles of chilling and mixing without the need for electricity.
Materials Needed
For the Water Bottle Ice Cream Maker, users will need:
Water bottle: A clean, empty, and dry plastic water bottle.
Ice cream base: A pre-made or homemade ice cream mixture.
Salt: About 1/2 cup of rock salt or ice cream salt.
Ice: Enough to fill half of the water bottle.
Plastic wrap: To secure the top and prevent leaking.
Step-by-Step Use
To use the Water Bottle Ice Cream Maker, follow these steps:
Prepare: Fill the water bottle halfway with ice, and add the salt. This will create a freezing mixture.
Add Mixture: Pour the ice cream base into the bottle, leaving space for expansion.
Secure: Place plastic wrap over the bottle opening before screwing on the cap to ensure a tight and secure seal.
Shake: Shake the bottle vigorously for about 3-5 minutes or until the ice cream mixture begins to harden.
Serve: Once the mixture reaches the desired consistency, remove the cap, uncover the plastic, and serve the ice cream directly from the bottle or scoop it out into a dish.
Homemade Ice Cream Techniques

Crafting homemade ice cream involves mastering a few key techniques to ensure a creamy, indulgent end product. These techniques revolve around preparing the custard base, refining the ice cream's texture, and incorporating various add-ins.
Creating the Custard Base
The foundation of many ice cream varieties is a rich custard base. This begins with heating a combination of cream, milk, and sugar until the sugar dissolves. Then, they temper it by slowly pouring the warm mixture into beaten egg yolks, constantly whisking to prevent curdling. After tempering, they return the mixture to heat, stirring constantly until it thickens enough to coat the back of a spoon. For certain flavors, such as banana, pureeing the fruit and incorporating it into the mixture at this stage can infuse the ice cream with natural flavor.
Achieving Smooth Texture
A smooth texture is pivotal for pleasurable ice cream. This involves chilling the custard base thoroughly before churning; typically, one would refrigerate it for at least 4 hours or overnight, which also allows the flavors to meld. The actual churning process breaks down ice crystals, aiding in creating a velvety consistency. Another key is not to overfill the ice cream maker, letting the mixture expand and air incorporate evenly, avoiding a dense or icy texture.
Incorporating Add-ins
Strategic inclusion of add-ins can elevate homemade ice cream to a new level of delight. For example, chocolate chips or small pieces of fruit should be added in the last few minutes of churning to distribute evenly without sinking. If one is using fruit purées or sauces, they can swirl these into the ice cream after churning to create a marbled effect, taking care not to overmix and lose the definition between the ice cream and the purée.
Ice Cream Without a Machine
Making ice cream without a traditional machine is entirely feasible and can yield delicious results. The no-churn method and use of alternatives such as immersion blenders and food processors allow for creative and convenient ways to produce homemade ice cream with ease.
No-Churn Methods
No-churn ice cream is a straightforward technique that does not require special equipment. A basic approach involves whipping heavy cream until it reaches soft peaks, then gently folding in sweetened condensed milk to add sweetness and smoothness. This mixture can be poured into a loaf pan and placed in the freezer. Stirring the mixture every 30 to 45 minutes during the initial freeze helps to break up ice crystals, resulting in a creamier texture. Here's a simple outline:
Whip: Whip the heavy cream until it reaches soft peaks.
Fold: Gently fold in the sweetened condensed milk into the whipped cream.
Freeze: Pour the mixture into a pan and freeze, stirring occasionally.
Alternatives to Traditional Equipment
For those without an ice cream maker, kitchen devices like immersion blenders or food processors can be used to simulate the churning process. The goal is to incorporate air and break up ice crystals for a smooth consistency. They can be utilized in the following ways:
Immersion Blender:
The ice cream mixture can be partially frozen, then the blender is used to smooth out the texture.
This process is repeated a few times until the desired consistency is achieved.
Food Processor:
Blend a frozen ice cream mixture to break up ice crystals and aerate the ice cream.
This also may require multiple rounds of freezing and processing for optimal smoothness.
Both methods aim to mimic the continuous churning effect of an ice cream machine, introducing air into the mixture and preventing large ice crystals from forming.
Serving and Storage Tips
For ice cream enthusiasts who value quality and convenience, understanding the nuances of serving and storing homemade ice cream is crucial. The Water Bottle Ice Cream Maker revolutionizes the way one can create and enjoy this frozen treat, but to maintain its freshness and texture, certain practices should be followed.
Optimal Serving Temperature
The ideal serving temperature for ice cream is between 10°F and 20°F. At this range, the ice cream is soft enough to be palatable yet firm enough to hold shape. When ready to serve, one should remove the ice cream from the freezer and let it sit for a few minutes to soften slightly.
Long-term Freezer Storage
Longevity in the freezer is achievable by adhering to these storage guidelines:
Airtight Containers: Always opt for freezer-safe, airtight containers to ward off freezer burn and odor absorption.
Plastic Wrap: Press a layer of plastic wrap directly onto the surface of the ice cream before sealing the container to add an extra barrier against ice crystals.
Flat Containers: When possible, use shallow, flat containers to promote uniform freezing and simplify scooping.
Freeze Promptly: Return the ice cream to the freezer immediately after serving to maintain its consistency.
By incorporating these tips into their routine, ice cream aficionados ensure each scoop from their Water Bottle Ice Cream Maker remains as delightful as the first.
Health and Nutrition

When crafting ice cream with a water bottle ice cream maker, health and nutrition can be directly influenced by the ingredients selected, such as the base and sweeteners. This lets consumers tailor their dessert to their dietary needs.
Calorie and Macronutrient Content
The calorie and macronutrient content of ice cream can vary significantly depending on the recipe. Typically, traditional ice cream is high in calories and fat due to its cream and sugar content. However, when using a water bottle ice cream maker, users have the flexibility to control these aspects.
Traditional Ice Cream (per serving):
Calories: Approximately 200-250
Fat: 10-16 grams
Carbohydrates: 20-30 grams
Protein: 2-4 grams
Sodium: 40-60 milligrams
Ice cream made from alternative ingredients, such as protein-rich shakes, can offer a different nutritional profile. For example:
Protein Shake Ice Cream (per serving):
Calories: Around 150-200
Fat: 5-9 grams
Carbohydrates: 10-20 grams
Protein: 15-25 grams
Sodium: 100-150 milligrams
Dairy and Sugar Alternatives
For those who seek dairy-free options, plant-based milks such as coconut milk or nut milks offer a valuable alternative. Not only do they provide distinct flavors but they can also lower the dessert's overall calorie count.
Coconut Milk (per serving):
Calories: 45-60
Fat: 4-5 grams
Carbohydrates: 1-3 grams
Protein: 0-1 grams
Nut Milks (almond, cashew, etc., per serving):
Calories: 30-50
Fat: 2-4 grams
Carbohydrates: 1-2 grams
Protein: 1 gram
Sugar alternatives, such as Stevia or monk fruit sweeteners, can significantly reduce calorie content without sacrificing sweetness. They are also helpful for those managing sugar intake, such as people with diabetes. Using these sweeteners can also prevent the rapid blood sugar spikes associated with high-sugar foods.
Recipe Innovation
The Water Bottle Ice Cream Maker revolutionizes the homemade ice cream experience by inviting users to exercise their culinary creativity. Personalizing each batch becomes a seamless and enjoyable process.
Custom Flavor Creations
Ice cream enthusiasts can easily tailor their frozen delights to match their palate. Customization is key—users blend their chosen flavors to produce unique combinations. By shaking the water bottle ice cream maker, they incorporate fresh fruit, dark chocolate, or coconut flakes directly into the mixture. This method not only infuses the ice cream with these flavors but also ensures a uniform texture.
Fruits: Berries, bananas, mangoes
Chocolates: Milk, dark, or white chocolate chips
Extras: Nuts, coconut flakes, cookie crumbs
Vegan and Dietary Options
The Water Bottle Ice Cream Maker caters to diverse dietary needs without sacrificing taste. For those seeking vegan and dietary options, traditional dairy ingredients can be substituted with plant-based alternatives. Coconut milk or almond milk serve as excellent bases, providing a creamy texture while maintaining the integrity of the ice cream-making process.
A sample vegan recipe could include:
1 cup coconut milk
1/4 cup agave syrup or maple syrup
1/2 tsp vanilla extract
A pinch of salt
Optional: Cocoa powder or fresh fruit puree for flavor
Mixing these ingredients in the water bottle and following the shaking procedure results in a rich, dairy-free ice cream that's both satisfying and inclusive.
Advanced Techniques and Tips
In creating the perfect homemade ice cream with a water bottle ice cream maker, one must pay attention to the specifics of temperature management as well as the incorporation of ingredients that enhance texture.
Temperature Control and Monitoring
Temperature is a critical factor in the ice cream making process. Maintaining an optimal temperature range ensures proper ice crystal formation, which is essential for smoothness. Users should temper their mix by gradually bringing it to the desired coolness, avoiding shock to the ingredients that can result in an uneven texture. Monitoring the temperature with a reliable thermometer is a must.
Freeze Water Bottle: Ideally, the water bottle should be frozen at -18°C (0°F) for at least 24 hours before use.
Heat: Prior to mixing, ingredients should be heated only as much as needed to dissolve granulated sugar and other soluble add-ins.
Cold Ingredients: Ingredients should be as cold as possible before shaking to expedite the freezing process.
Rock Salt: For those using ice in a salt-ice mixture, rock salt can help lower the freezing point, causing the ice cream mixture to freeze faster.
Refining Texture with Additional Ingredients
The addition of select ingredients can elevate the texture of the ice cream. While using basic cream and sugar can produce a delightful result, the incorporation of alcohol and lemon juice can prevent the ice cream from freezing too hard and enhance its creamy consistency.
Alcohol: A tablespoon or two of spirits like vodka or liqueur can be added to prevent over-freezing due to alcohol's lower freezing point.
Acids: A small amount of lemon juice can help break down the milk proteins, leading to a smoother consistency.
Sugar Types: Using different types of sugar or sweeteners can influence the texture and freezing characteristics.
Here's a handy reference table for ingredient influence on texture:
Ingredient Effect on Texture Recommended Quantity Alcohol Prevents over-freezing 1-2 tablespoons Lemon Juice Smoothens texture 1 teaspoon Granulated Sugar Sweetness & Freezing Point Depression To taste
To mix, one should utilize a rubber spatula for its flexibility, allowing thorough incorporation without introducing too much air, which can affect the final consistency. Carefully fold the mixture within the bottle, maintaining a gentle and consistent motion.
